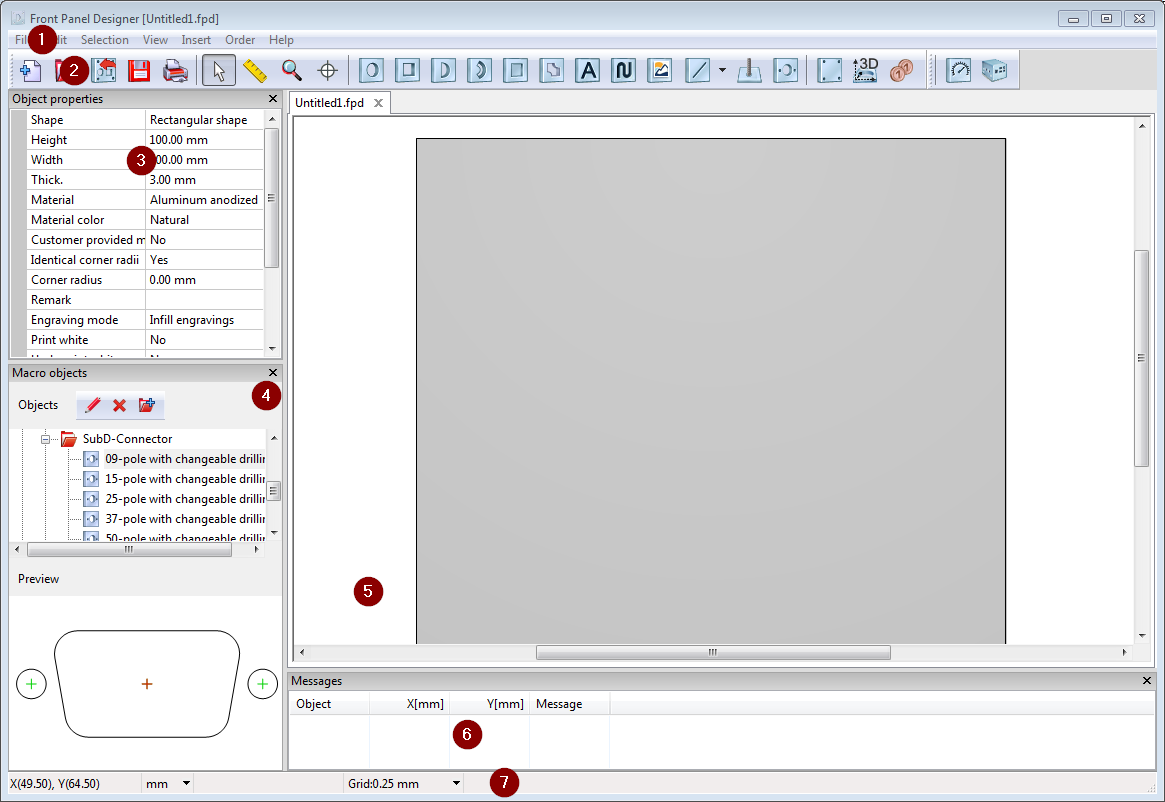
User interface
When you start the program, the user interface with which you can create, open, and/or edit your front panel files opens. A properties display for selected objects and the macro elements catalog are available to you in addition to the menu bar and toolbar. In the following section, we describe the individual sections of the user interface.

❶ Menu bar
In the menu bar’s pull-down menus, all the program’s commands are listed by topic. They can be triggered both with the keyboard (Alt + the respective underlined letters) and via mouse click. Keyboard shortcuts are also available next to most of the commands.
The Select menu’s functions can also be accessed in the Context menu (right-click on an object in the workspace).
❷ Toolbar
In the toolbar, you will find basic program functions, in particular all milling and design elements that you can insert into the front panel. When you move the cursor over the icons, tool tips appear with the name of the respective function. The commands and modes are described in the corresponding sections in this help manual.
❸ Element properties list
The element properties list (on the left side of the screen by default, accessible via Menu > View or Shift + Ctrl + O), shows the properties and position of one or more marked objects (or, if no object is selected, the front panel properties). You can directly change the values here. If multiple objects are selected, the properties common to the objects can be edited.
❹ Macro elements
The macro elements catalog contains the available macros, sorted by category, in the upper area. A preview of the selected element is displayed in the lower area.
You can find more information on macro elements in the macroelements section
❺ Workspace
Each front panel is opened in its own workspace. You can use the tabs at the top to switch between several open front panels.
❻ Message list
Some actions, especially subsequent change of material thickness, can lead to errors or to the need to make a tool adjustment. As soon as such a message is generated, the message window opens and displays object-specific information. You can use these messages to make necessary changes to the objects concerned.
❼ Status bar

The status bar at the bottom of the screen consists of four information display areas that are described here from left to right:
In the first area, the current position of the mouse is displayed in relation to the current origin of the base panel. Information is displayed in the units that have been set as units in the “Settings” dialog on the “View” tab.
- In the second area, the specified units can be changed by clicking the drop-down list.
Change the unit of measurement:
To change the unit of measurement for all future elements, click the required unit (mm or inches). Elements that already exist retain their original units.
To change the unit of measurement for all existing and subsequent elements, including the front panel itself, click the desired unit and then “Adjust all elements.”
In the third area (not displayed here), the current difference between the new position of an element and its original position is shown if elements are moved with the mouse.
In the fourth area, the grid base can be set to certain predetermined values.
Context-sensitive help or information may be displayed in the fifth area.
